

Background
When I first started building my smart home, I had only a few smart lights around the house and a few voice assistants. Given I was actively pursuing printed circuit board design and coding, I thought designing my own sensors to add to the smart home would be a good challenge for me.
The Microcontroller
The most popular way to add custom sensors around the home was using WiFi-enabled microcontrollers such as the ESP8266 and the ESP32, both from Espressif Systems. I had some Particle Photons, but I decided to go against what I already knew and try a new platform. After seeing what Adafruit was accomplishing with their Feather ecosystem, I realized designing a “wing” (what a daughter-board in the Feather ecosystem is called) would allow a user to stack even more sensors for their custom smart home nodes, or use the wing for other scenarios.
IR Blaster
I believe having an IR LED in a smart home is an underrated function. When we are creating a smart home, we can consciously buy electronics that are supported in our existing ecosystems. But for those electronics that are still functioning perfectly, we can read the IR signal from the included remotes and add the codes to our “smart” IR blasters to add greater control.
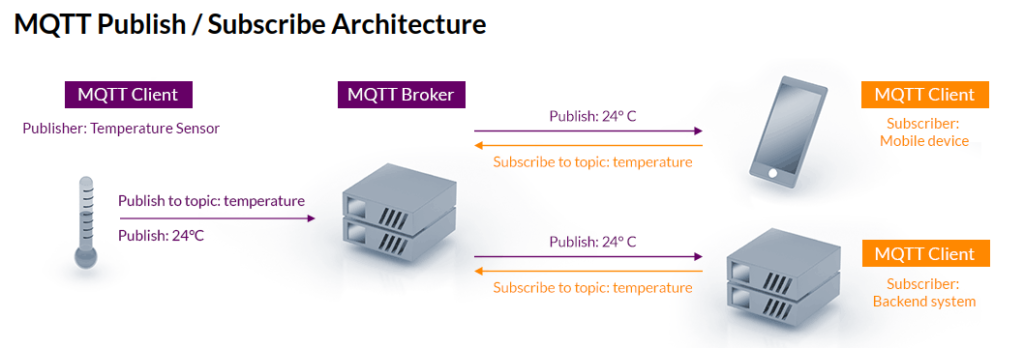
MQTT
MQTT is a popular standardized messaging protocol in the realm of IoT (Internet of Things). In application, there is an MQTT Broker and at least one MQTT Client. The broker’s purpose is to gather messages sent to it and push messages out to clients who are listening on specific topics that have messages pushed to. The client can push messages to the broker, but will need to specify a topic. Here is a helpful image that can be found on MQTT.org:
The Prototype
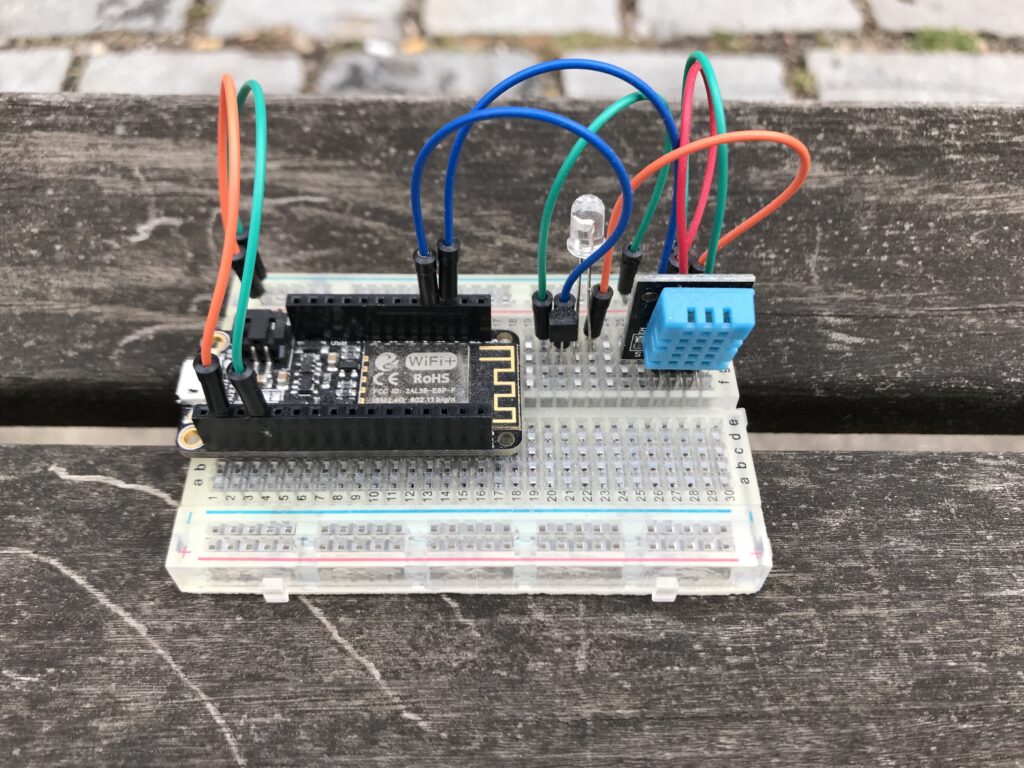
I love breadboards due to their simple and effective nature. In almost all cases I will mock up my circuit before sending it out to a PCB manufacturer. Here you can see I used the Feather Huzzah ESP8266, a breadboard friendly DHT11 temperature and humidity sensor, and an IR LED.
The PCB
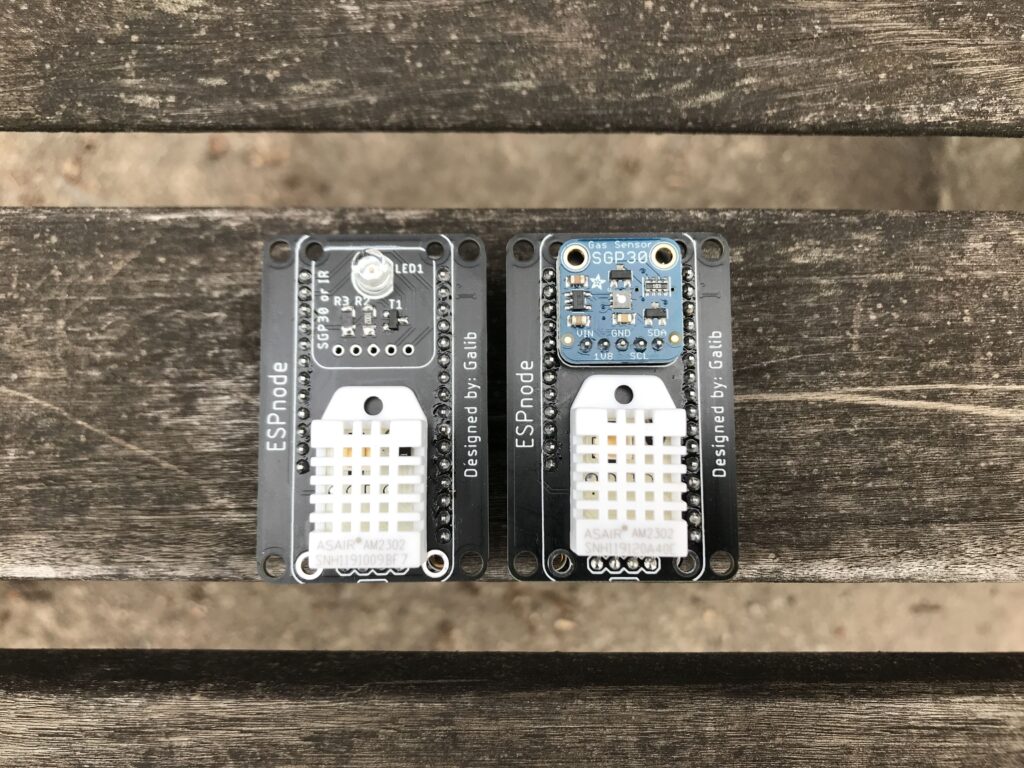
My efforts resulted in a wing that can always accommodate a DHT22 temperature and humidity sensors and the option of populating either an IR LED or an SGP30 indoor air quality sensor. I replaced the DHT11 in the initial prototype with the DHT22 sensor due to its improved accuracy.
Node-Red
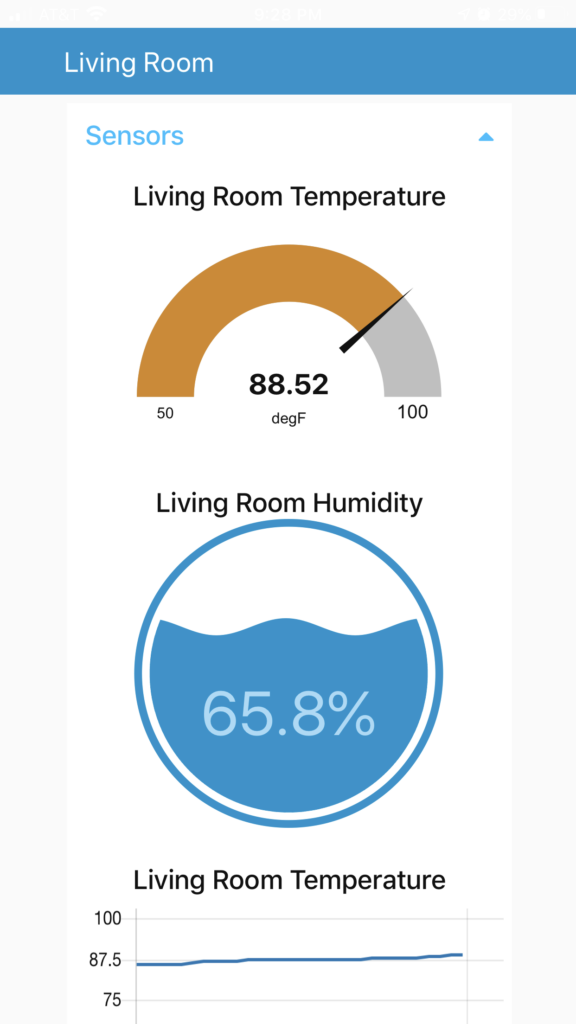
It goes without saying that a good looking and functional graphical user interface can make or break the user experience. After getting the data to my MQTT broker, I focused on a user interface for my family to view the temperature and humidity. For this, I decided to use Node-Red; which was another application running on the same Raspberry Pi Zero W as the one that was hosting the MQTT broker.
Modernizing in 2023
When I originally started this project, I had an MQTT broker running on a dedicated Raspberry Pi Zero W and I wanted to use MQTT to its fullest potential on the Arduino ecosystem.
Fast forward to 2023, my smart home has grown tremendously, I appreciate more reliable hardware, and I appreciate ways to reduce my digital and electrical footprint.
Recently, I have been testing ESPHome as an add-on on my instance of Home Assistant. I can not recommend ESPHome enough to anyone who is looking to make custom smart home hardware, independent of whether or not they have coding experience. ESPHome makes it easy to get connect hardware to an ESP8266, ESP32, or RP2040 working as intended. In addition, when ESPHome and Home Assistant are working together, you can easily view your sensors and record them over a period of time.
Here is an example yaml file that would get the ESPnode working on ESPHome:
esphome:
  name: espnode # give the entity a name
  friendly_name: espnode # give the entity a name

esp8266:
  board: huzzah

# Enable logging
logger:

# Enable Home Assistant API
api:
  encryption:
    key: "<YOUR_KEY_HERE>" # enter your Home Assistant API key here

ota:
  password: "<OTA_PASSWORD_HERE>"

wifi:
  ssid: !secret wifi_ssid # you should have enabled secrets for your wifi
  password: !secret wifi_password

  # Enable fallback hotspot (captive portal) in case wifi connection fails
  ap:
    ssid: "Espnode Fallback Hotspot"
    password: "<FALLBACK_PASSWORD>"

captive_portal:

i2c:
  sda: 4
  scl: 5
  scan: true

sensor:
  - platform: dht
    pin: 2
    temperature:
      name: "Office Temperature"
      id: office_temp
    humidity:
      name: "Office Humidity"
      id: office_humid
    model: DHT22
    update_interval: 60s
  - platform: sgp30
    eco2:
      name: "Office eCO2"
      accuracy_decimals: 1
    tvoc:
      name: "Office TVOC"
      accuracy_decimals: 1
    store_baseline: yes
    address: 0x58
    update_interval: 1s